Looking to guard your privacy, unblock websites, or solve internet issues on your Android device?
This guide gives you everything you need.
You’ll learn how to change your IP address using built-in settings, VPNs, proxies, and advanced tools. Whether you’re on Wi-Fi or mobile data, these methods give you better control over how your device connects online.
Let’s begin with why it matters.
Why Change Your IP Address on Android?
Changing your IP address on Android is more than just a tech trick. It’s a smart move for anyone who wants more control over their online activity. Here’s a guide on how to change your IP on iPhone.
Here are some common and important reasons:
- Protect your privacy from websites, advertisers, or apps that monitor your IP location
- Unblock region-restricted content on streaming platforms and apps that limit access by country
- Fix network conflicts that cause unstable or failed connections on shared Wi-Fi networks
- Stay safer on public Wi-Fi by preventing others on the network from tracking your online activity
- Work around blocked or restricted IPs used by some apps, games, or internet providers
Now that you know why it helps, the next step is finding out what your current IP address is.
How to Find Your Current IP Address
Before you try to change your IP, it’s important to know what it currently is. This will help you confirm if the method you used worked.
You need to check two types of IP addresses:
- Local IP (used within your Wi-Fi network)
- Public IP (used when you access the internet)
To find your local IP:
- Go to Settings
- Tap Network & Internet
- Select Wi-Fi
- Tap your connected network
- Look under IP address
This address often starts with 192.168. or 10., that’s your private network address.
To find your public IP:
- Open a browser
- Go to whatismyip.org
- Or use an IP checker app like IP Tools from the Play Store
Once you know your current IP, you can move on to changing it.
Quick Methods to Reset Your IP Address
If you need to change your IP fast, there are some simple tricks you can try right away. These work without needing to install any apps.
They’re helpful when you’re having minor connection issues or just want a different IP for privacy.
Toggle Airplane Mode
This is the fastest way to get a new mobile IP address. It works because turning off your network connection causes your phone to request a new address when it reconnects.
Steps:
- Swipe down from the top of your screen
- Tap the Airplane Mode icon
- Wait about 30 seconds
- Tap it again to turn it off
- Check if your IP has changed using a browser or IP-checking app
Forget and Rejoin Wi-Fi Network
This method refreshes your network session and asks your router for a new local IP address. It’s useful for solving connection problems at home or work.
Steps:
- Go to Settings > Wi-Fi
Tap and hold your connected network
- Select Forget
- Tap the network again and enter the password
- Recheck your IP under Wi-Fi settings
Reboot Device and Router
If nothing else works, restarting both your device and your router can force a fresh connection. This might result in your internet provider assigning a different IP.
Steps:
- Restart your Android phone
- Unplug your Wi-Fi router
- Wait about 2 minutes
- Plug it back in
- Reconnect to Wi-Fi and check your IP again
Now let’s move to more advanced control with manual settings.
Assigning a Static IP on a Wi-Fi Network
If you want to avoid IP conflicts or set up a more consistent network, assigning a static IP is a useful option. This method gives your phone a fixed IP address within your home network, which stays the same until you change it.
Access Advanced Wi-Fi Settings
To start, you’ll need to modify the network settings for your Wi-Fi connection.
Steps:
- Open Settings > Network & Internet > Wi-Fi
- Tap your connected Wi-Fi network
- Press the pencil icon to edit it
- Tap Advanced options
- Change IP settings from DHCP to Static
Enter Static IP Details
Next, you’ll enter the IP configuration manually. This tells your phone what address to use and how to connect properly.
Here is what it looks like –
Required fields:
- IP address: For example, 192.168.1.201
- Gateway: Your router’s address (often 192.168.1.1)
- Subnet mask: Usually 255.255.255.0
- DNS servers: You can use 8.8.8.8 and 8.8.4.4 (Google DNS)
Make sure your selected IP address fits within your router’s allowed range to avoid conflicts.
Let’s now explore how to change your public IP securely using a VPN.
Changing Your Public IP with a VPN App
Using a VPN is the most effective way to change your public IP and protect your internet traffic. It reroutes your connection through another server and hides your real location.
This method also adds encryption, which protects your activity from being seen by others on the network.
Choosing a Reliable VPN Service
Not all VPNs are equal. Choose one that prioritizes privacy, performance, and transparency.
Look for these features:
- A clear no-logs policy
- A wide range of server locations
- Strong security protocols (like OpenVPN or WireGuard)
- A well-rated Android app with easy setu
Recommended VPNs:
- ExpressVPN
- NordVPN
- ProtonVPN
- Surfshark
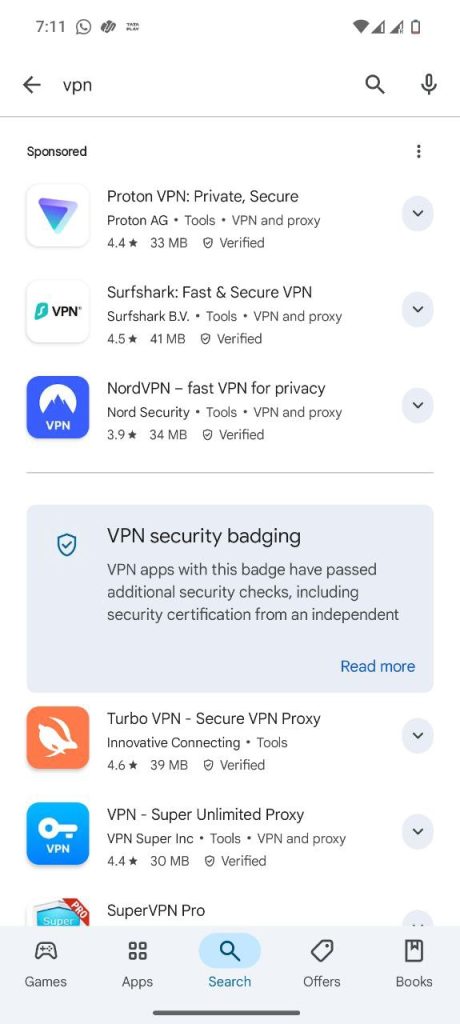
Installing and Connecting to a VPN on Android
Once you’ve selected a VPN, setting it up takes just a few steps.
Steps:
- Open the Google Play Store
- Install your chosen VPN app
- Open the app and sign in
- Select a server in the country you want
- Tap Connect
- Confirm your new IP with whatismyip.org
If a VPN isn’t what you need, you can try a proxy server next.
Using Proxy Servers on Android
A proxy server works like a middleman between your phone and the internet. It hides your real IP address during browsing, but it doesn’t offer the encryption of a VPN.
This can be useful when you only want to change your IP for specific tasks, like accessing a website.
Set Up a Proxy Manually
Android lets you set a proxy server through Wi-Fi settings.
The steps look like this –
- Go to Settings > Wi-Fi
- Tap and hold your connected network
- Select Modify network
- Tap Advanced options
- Under Proxy, choose Manual
- Enter the proxy IP and port number
- Save and reconnect to apply the settings
Proxy Apps You Can Try
For more control, use proxy management apps.
Options include:
- Drony – Works without root access
- ProxyDroid – Requires root and offers app-specific proxy settings
Now let’s talk about how to change your IP when using mobile data.
Changing IP on Mobile Data Network
Even if you’re not connected to Wi-Fi, you can still change your IP address. Mobile networks use different methods, but they often give you a new address after reconnecting.
Toggle Airplane Mode Again
This is often enough to refresh your mobile IP.
Steps:
- Turn on Airplane Mode
- Wait about 30 seconds
- Turn it off and reconnect to mobile data
- Visit an IP-checking site to confirm the change
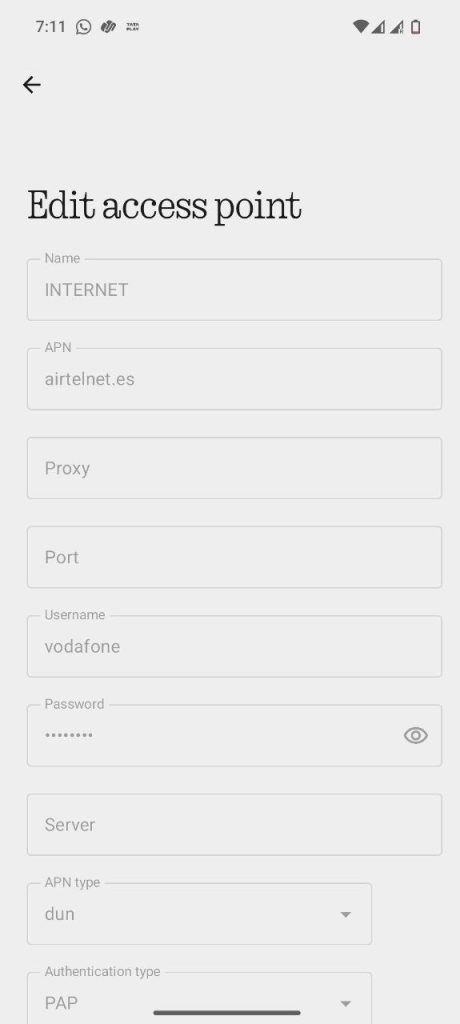
Reset APN Settings
If you’ve customized your mobile settings, resetting them might trigger a new IP.
Steps:
- Go to Settings > Network & Internet > Mobile Network > Access Point Names
- Tap the menu icon
- Select Reset to default
Your carrier will apply the default APN and may assign a new IP as a result.
For users with rooted phones, there are even deeper options.
Advanced Techniques for Rooted Devices
If your device is rooted, you can change your IP at a system level using terminal commands. These tools offer more flexibility but also carry more risk.
Use these methods only if you’re confident in what you’re doing.
Use Terminal Emulator for Manual IP Settings
You can use a command-line app like Termux to assign a custom IP.
Steps:
- Install Termux from the Play Store
- Open it and type: ip address show to view your current IP
- Run a command sequence
Below is an example of one such command sequence.
su
ip addr del 192.168.1.100/24 dev wlan0
ip addr add 192.168.1.77/24 dev wlan0
What we did here is that we changed your IP address on a rooted Android device using commands so first enter root mode with su. Then remove your current IP using and finally assign a new IP (3rd line of code).
What this sequence does is that it temporarily replaces your device’s IP address for the current session.
It is important to replace the IP with one that matches your network. Enter incorrect details, and you may lose connectivity.
Verifying Your New IP Address
Once you’ve made changes, always confirm whether they worked. This prevents confusion and helps troubleshoot problems.
Ways to check:
- Open Wi-Fi settings and view your new local IP
- Visit whatismyip.org to check your public IP
- Use IP-checker apps for faster access
Troubleshooting Common Issues
Sometimes the new IP doesn’t stick, or the connection breaks. Here’s how to fix the most common problems
1. DNS Cache Problems
- Clear yor browser’s cache
- Restart your device
- Switch to a public DNS like 8.8.8.8
2. IP Conflicts
- Ensure your static IP is not already in use
- Reboot your router to reassign network addresses
3. No Internet After IP Change
- Recheck your IP, subnet, and gateway settings
- Revert to automatic IP if manual settings cause errors
4. VPN or Proxy Not Connecting
- Try another server
- Change the connection protocol
- Reinstall the app if needed
Conclusion
Changing your IP address on Android puts you in control of your network identity.
To recap:
- Try fast fixes like toggling airplane mode or restarting your
- Set a static IP for consistent access on local networks
- Use a VPN for privacy, security, and access to global content
- Apply a proxy for lighter IP changes without encryption
- Explore advanced tools only if your device is rooted
Now browse more freely, stay protected and avoid common network restrictions directly from your Android device with these methods.